Based on my last Blogpost Automatically ingest Event Hub Data to Azure Data Explorer using Python I wanted to use those simulated IoT Data to explore Azure Time Series Insights (TSI) capabilities. Time Series Insights collects, processes, stores, queries and visualizes data at Internet of Things (IoT) scale! With this service, you can analyze your operational data and unveil hidden trends and spotting anomalies.
With this post I would like to provide you insights into:
- connecting a data source to TSI
- explore the data model in TSI
- configuration of custom data types
- using the REST API to modify the data model
- understanding interpolation
Of course this post does not use enterprise scale IoT data but to provide a common understanding how different configurations work, it is best to look at this first in a smaller scale. You can adopt accordingly!
Azure Time Series Insights Environment
The setup of TSI will not be covered in this post as i assume either your TSI environment is already setup or in case it isn´t please refer to the official documentation: Setup a TSI Environment using the Portal
selection of the Time Series ID
selecting an appropriate Time Series ID is a critical step while creating the environment. A Time Series ID is almost similar like choosing a Database partition key. It is an unique identifier for your time series model.
Also in this case, please check the offical documentation to see what possibilities you have by choosing the best-fitting TSID. Choosing an appropriate TSID
Once the environment is created with the specified TSID, you are not able to change it afterwards! choose wisely!
connecting a data source to TSI
TSI contains an ingestion engine to collect, process and store streaming time series data. TSI consume and stores data in near real time. Azure Time Series can currently have to streaming event sources:
- Azure IoT Hub
- Azure Event Hub
As my python script in the previous blogpost used Event Hub to sent simulated sensor data to, I will connect Event Hub to TSI.
While creating a time series insights environment, you can create an event source during the setup process or you can skip it and create it later. The screenshot shows how you could configure this at a later point in time.
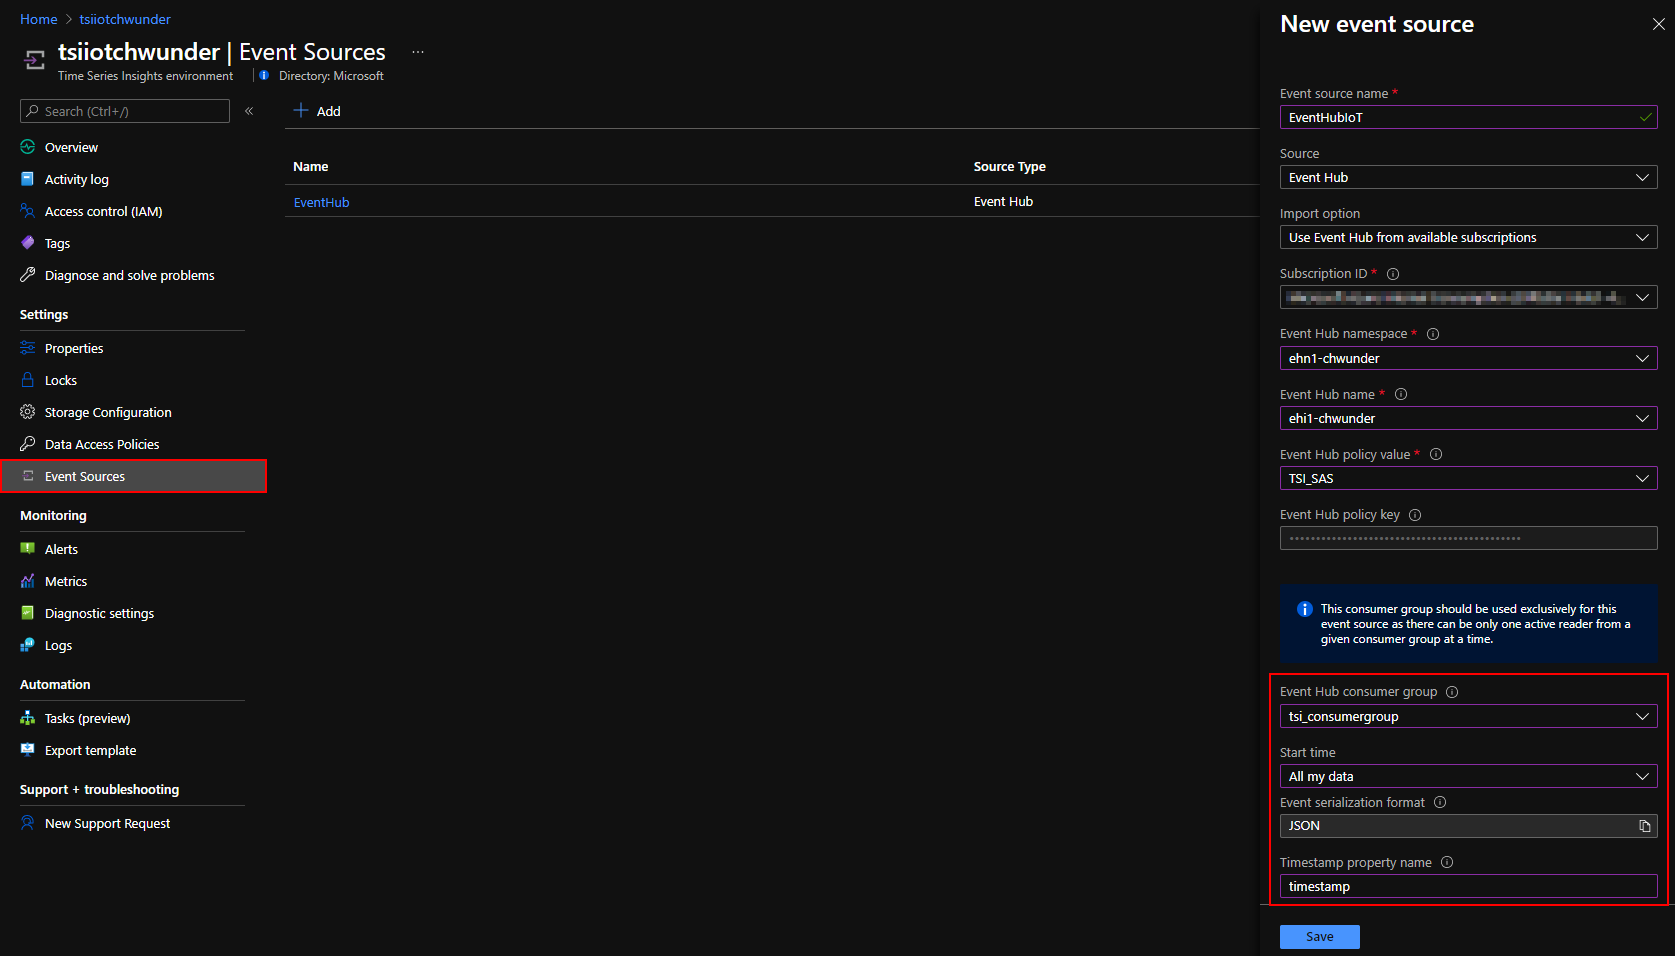
I would recommend you create a dedicated Event Hub Instance SAS policy as well as a dedicated consumer group for the TSI environment. Can be quite useful in case you have other event hub listeners configured. Keep attention especially to the Start Time as well as the Timestamp property name in the wizard. If you are sending a custom timestamp on your events to Event Hub or IoT Hub, you can use this custom data field. If you don´t specify it, event enqueue time is used.
Once you have created your event source, you should see data in TSI.
Data Model in Azure Time Series Insights
In most cases, Events and Data you send to IoT Hub or Event Hub need to be transformed to gain valuable insights. This data computation can be done by using Azure TSI.
The Azure TSI Data Model consist of three core components:
- Time Series Model instances
- Time Series Model hierarchies
- Time Series Model types
Time Series Model instances
TSI instances are usually uniquely identified by deviceID or assetID, which are saved as time series IDs. In our case I have used a couple of simulated IoT Devices which are sending sensor data for temperature and humidity. Each simulated IoT device is represented as an instance within TSI.
Remember from the previous blogpost, my simulation is sending those information:
{ body: '{"timestamp": "2021-08-20 23:36:22.937446", "temperature": 27.4, "humidity": 47.64, "iotdevice": "device1"}', properties: {'Table': 'TestTable', 'IngestionMappingReference': 'TestMapping', 'Format': 'json'} }
{ body: '{"timestamp": "2021-08-20 23:02:53.748482", "temperature": 13.0, "humidity": 50.0, "iotdevice": "device2"}', properties: {'Table': 'TestTable', 'IngestionMappingReference': 'TestMapping', 'Format': 'json'} }
As I have set iotdevice as my Time Series ID, each IoT Device like device0, device1, device2, … is a unique instance and therefore available in TSI.

After an Event is discovered and collected by the ingestion pipeline, an instance based on the TSID is automatically created.
Time Series Model hierarchies
Hierarchies are being used to group and logically order instances. Think of having a bunch of sensors in your e.g house. Those do have continues unique identifiers like device0, device1, device2, device3, …
After installing them you might want to build a layout based on your floors and rooms.
- First Floor
- Bathroom
- device0
- Bedroom
- device1
- device2
- Bathroom
- Ground Floor
- Living Room
- device3
- Kitchen
- device4
- ....
- Living Room
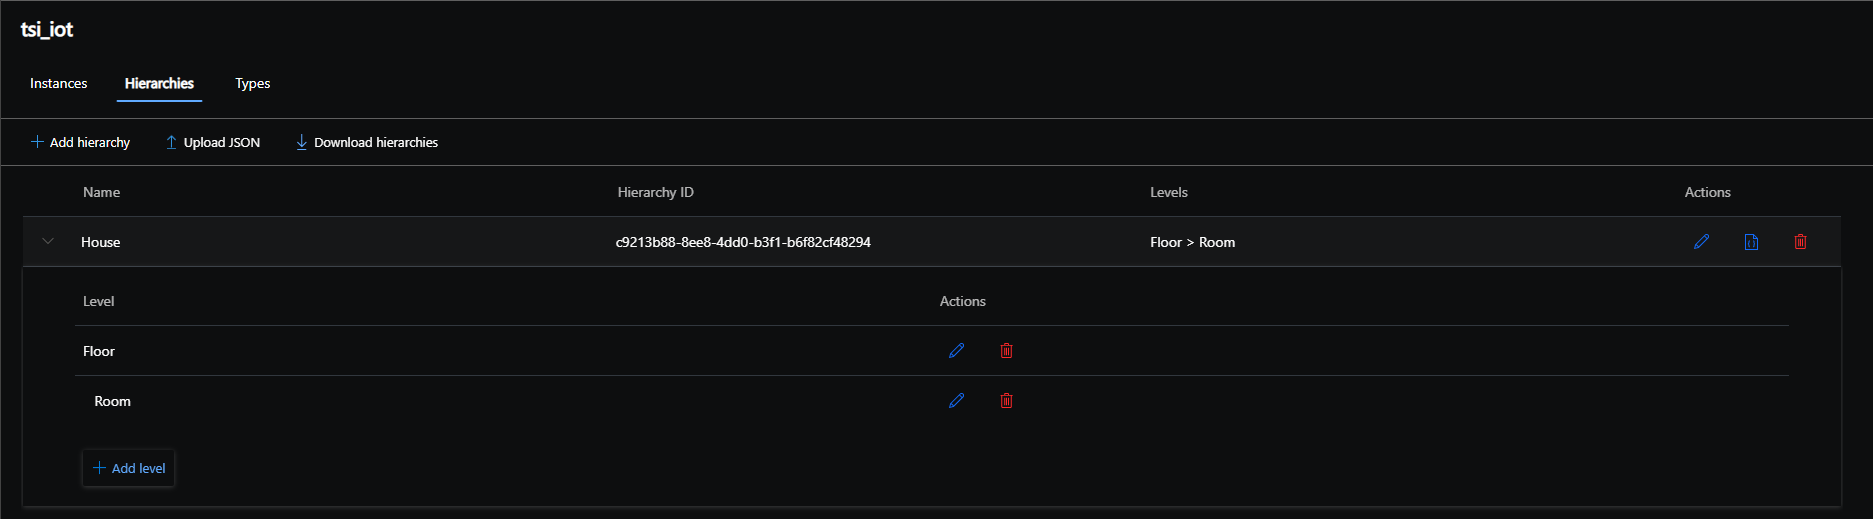
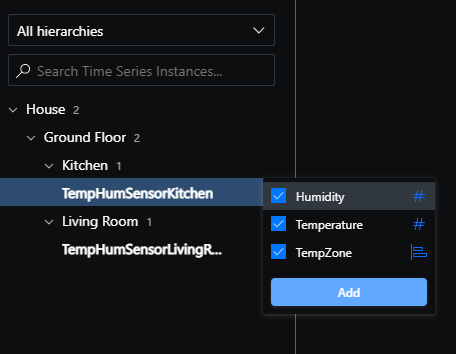
You can create a hierarchy model called House which has the Floor as Level 1 and e.g Room as Level 2:
After you have created a hierarchy, you can assign an instance a hierarchy object and fill out the instance fields!
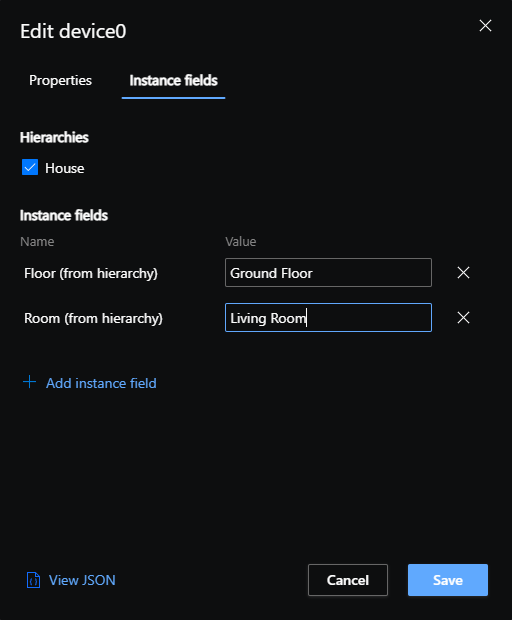
Furthermore you can assign a name and a description to each instance.

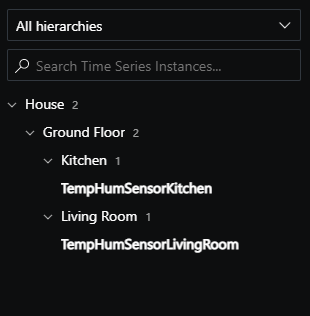
Once assigned, your data model will be applied accordingly!
Time Series Model types
Now as we have ordered our sensor data, remember we are still looking at raw non-transformed data. Types are used to computate data and add relations between different data to gain insights!
As types are quite complex and offer a lot of different methods for calculations, I would like to encourage you to take a look on the official docs Time Series Insights Types.
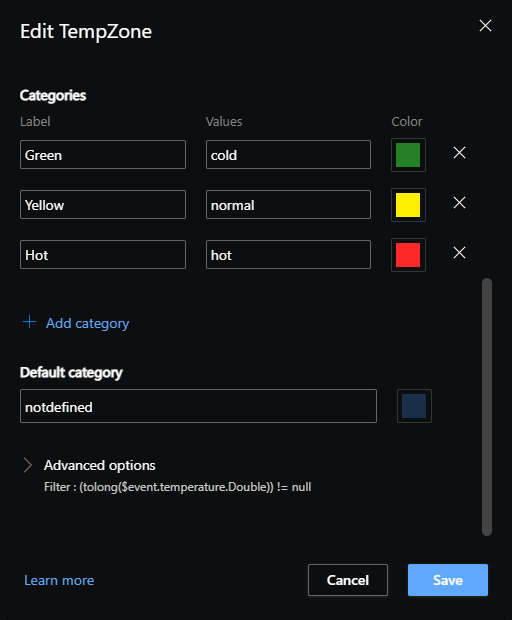
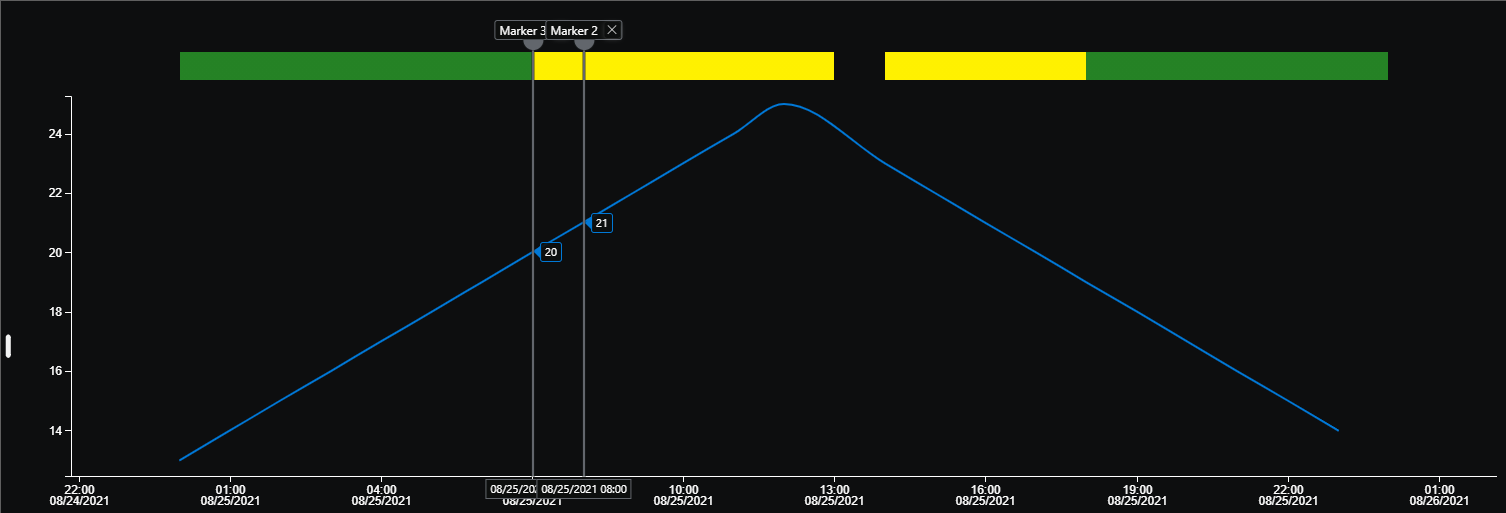
In my case i would like to categorize the temperature in three zones based on its value!
- green (<= 20)
- yellow (> 20 but <= 30)
- red (> 30)
Furthermore i still want to see the collected values for temperature and humidity.
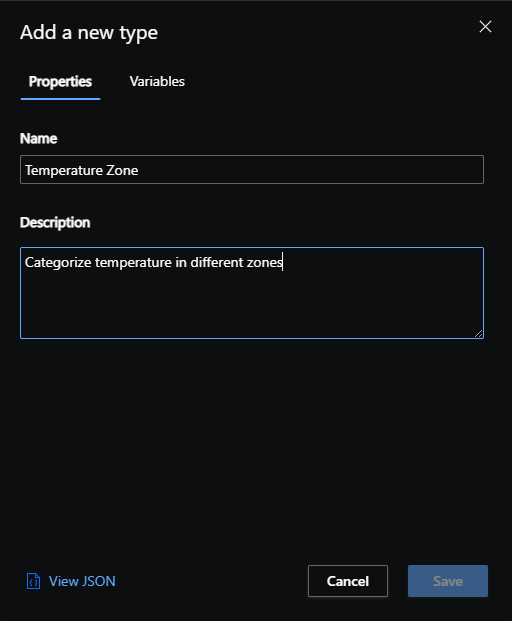
Start by creating a new type and give it a name as well as a short description.
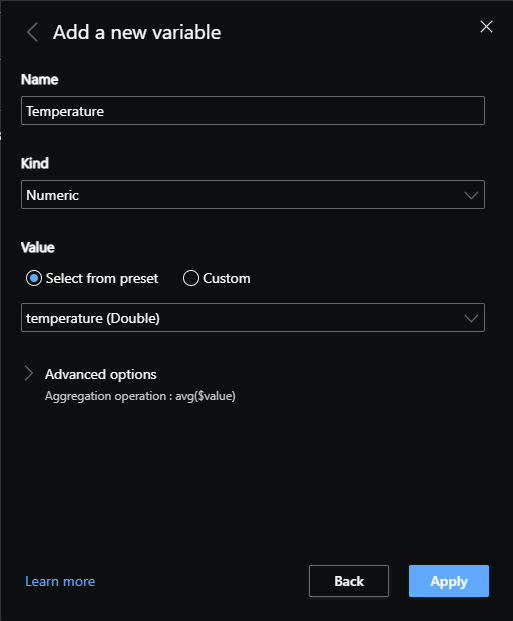
In the next step, we create variables. Variables are something you can render on the timechart! If you had previously used the default type for device0 as an example, you could choose to display temperature as well as humidity data on the chart. Once you create a new type only with our zone model, you can´t display the collected data for temperature as well as humidity anymore. Therefore we create those non-computated variables as well to still be able to display the raw data.
Do the same for the humidity data as well.
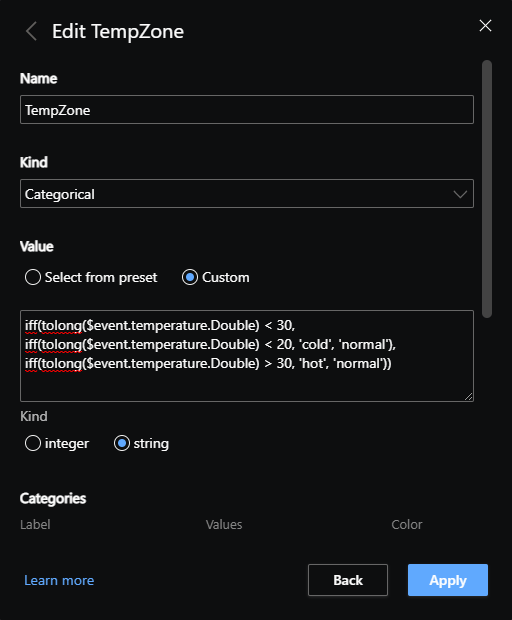
Next is to create as an example the temeprature zones shown above! Create a new variable, give it the name TempZone and select Kind Categorial. If we would have just raw values read from the sensor like 1,2,3 - we could simply provide the values and specify a appropriate color. In our case, we would like to do something a bit more complex to assign temp ranges, therefore switch for the value configuration to “custom” and provide use something like this.
iff(tolong($event.temperature.Double) <= 30, iff(tolong($event.temperature.Double) <= 20, 'cold', 'normal'), iff(tolong($event.temperature.Double) > 30, 'hot', 'normal'))
Last but not least, let´s change the Type for device1 from DefaultType to the one we have created earlier.
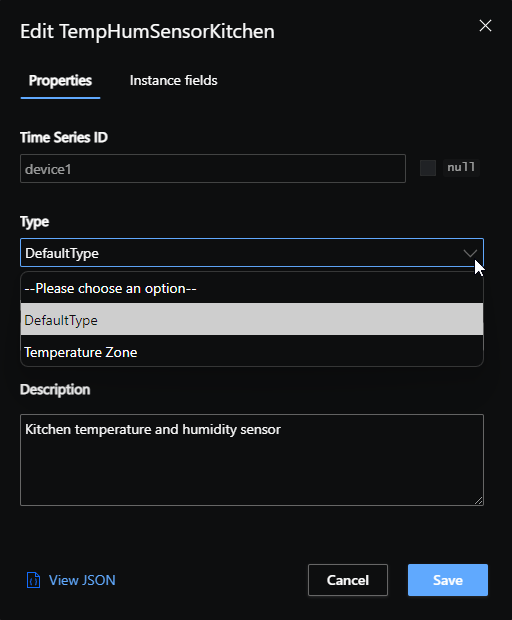
once applied, you are now able to not only present our newly created variable, but also the “default” ones.
furthermore, if we switch back to the analyze tab and check those two variables for events, you can see that it works exactly how we have configured!
using the REST API to modify the data model
Except of modeling data in the portal, there are plenty of other ways to do this. If you are dealing with big data than this would be the recommended way as you are facing probably thousands of different instances. Getting them sorted, creating hierarchies, creating different data types with even more variables will take way to much time and effort doing this in the TSI Explorer UI.
For this purpose, TSI offers various APIs you can work with. In our case we use the REST API to add, change, remove types and assign them to instances! TSI offers the following APIs:
- Environments APIs
- Model APIs
- Query APIs
- Time Series expression syntax
- API limits
The Model API includes APIs I use in my example like the Instance-, Hierarchy-, or Type API.
Before using those APIs, of course we have to fulfill some prerequisites. For a better visualization, I used postman to work with those APIs!
prerequisites
There are of course plenty ways to authenticate and authorize a service principal, a user, an app to use those APIs. In my case I have created:
- an AAD application registration
- set API permissions
- assigned a Data Access Policy in TSI
Open Azure Active Directory and register a new App registration.

Nothing special to take care of, just create a name and copy the values of Application (client) ID and Directory (tenant) ID. In addition, create a secret in Certificates & Secrets and remember also the secret value! We will need this later for authentication.
Once done, we have to provide necessary API permissions. Please assign the following permission to the created application.
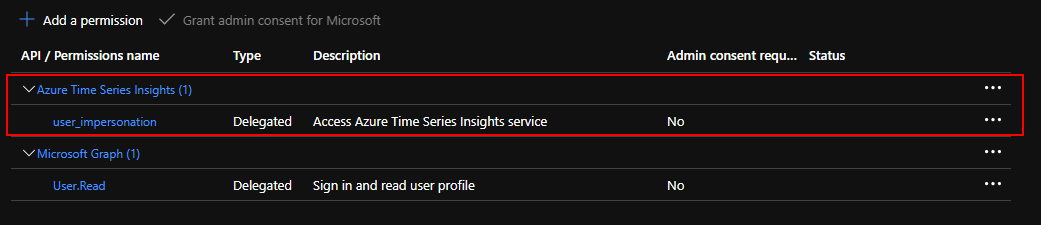
Once this is done, last step before using the APIs, we have to assign a data access policy for this application to TSI.
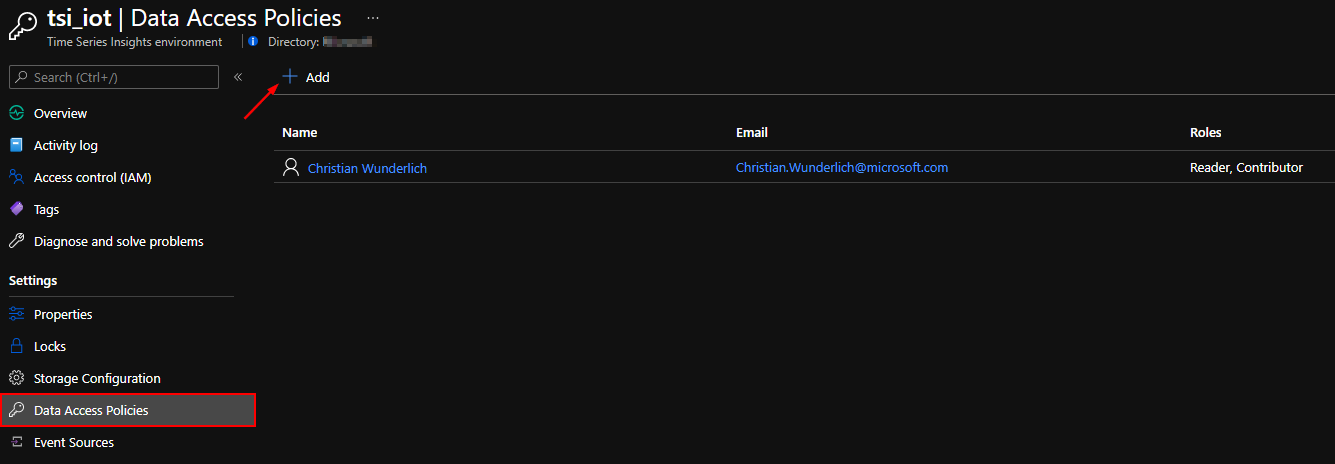
Depending on what you would like to do with the APIs, you can set Contributor and / or Reader. In my case, i have set both permissions as we are trying to change data and environmental settings. Select the application you have created in the previous steps!
If you have done this, you are ready for browsing data through those APIs!
using the REST API to modify the data model
I would like to showcase you how easy it is to do the same what we did manually by provding a JSON object to the REST API to create a data type, add variables, do calculations and assign the data type to an instance.
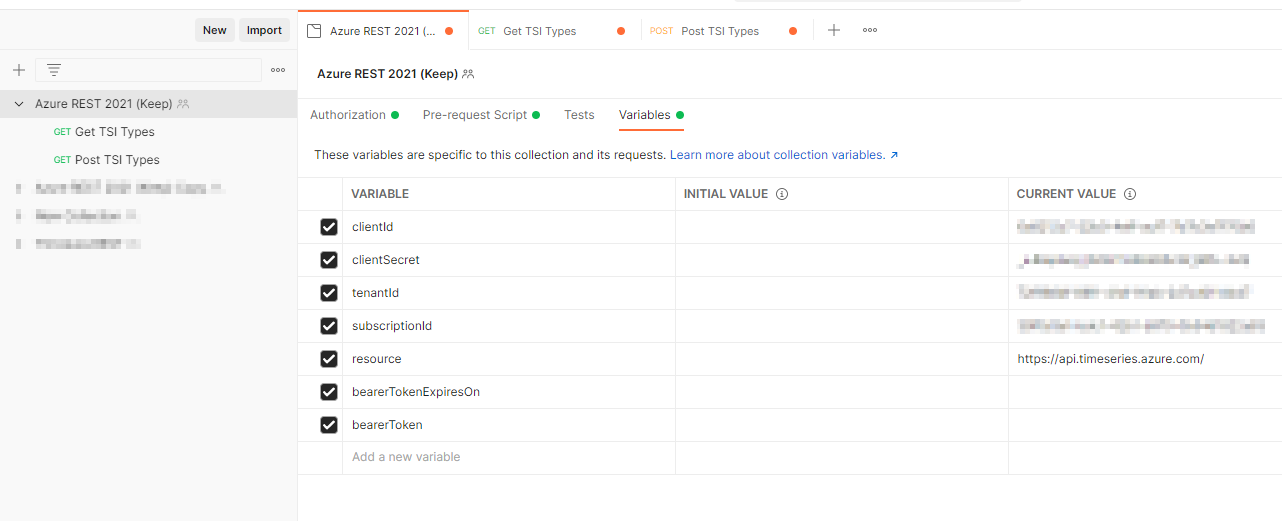
To save some time working with postman, you can take the collections from Jon Gallant and import it into your postman. He has already provided all the logic and postman variables to get a bearer token and save it later into a variable we can use for authentication while doing some TSI related API calls! The only thing you need to do is to import your data into the variables tab in the collection header and more importantly click save afterwards ;-)
Before starting to query all of our data types or instances, please take a look at the Model API for TSI in microsofts offical docs. It will provide you an overview about how it works in general and covers way more than what we do in this blogpost.
Jon used it for browsing and creating resource groups, we have to modify a bit the URL, but the schema itself stays the same. We can use as an example the following URL to retrieve all instances in our environment:
https://5db6f3ba-b7de-49ed-aff4-c16fcad98568.env.timeseries.azure.com/timeseries/instances?api-version=2020-07-31
As you see, this URL contains my TSI environment FQDN, you can get this from the azure Portal when opening the TSI service blade!
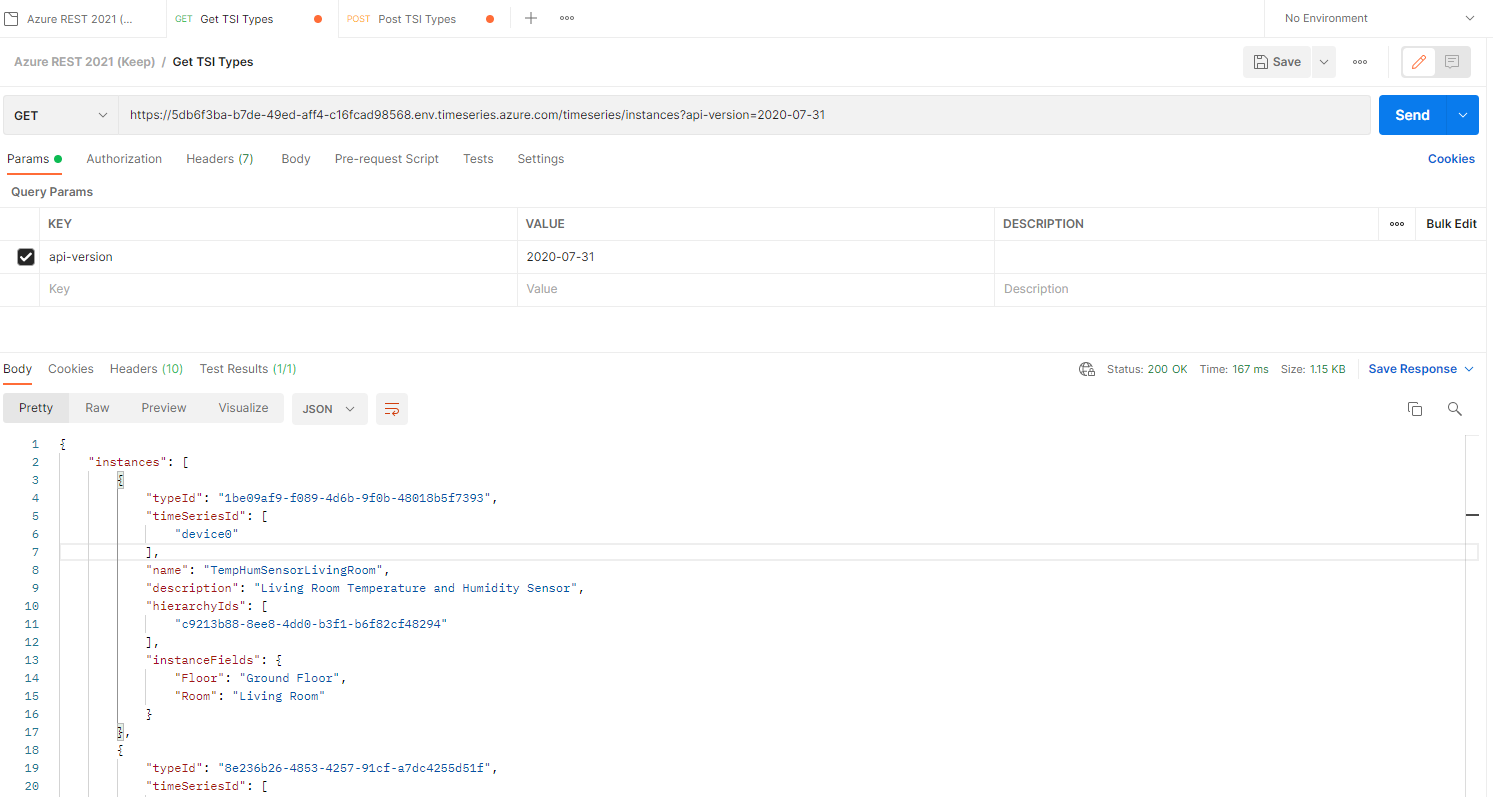
If we just hit send, we should get back a JSON object, containing all of our instances!
{
    "instances": [
        {
            "typeId": "1be09af9-f089-4d6b-9f0b-48018b5f7393",
            "timeSeriesId": [
                "device0"
            ],
            "name": "TempHumSensorLivingRoom",
            "description": "Living Room Temperature and Humidity Sensor",
            "hierarchyIds": [
                "c9213b88-8ee8-4dd0-b3f1-b6f82cf48294"
            ],
            "instanceFields": {
                "Floor": "Ground Floor",
                "Room": "Living Room"
            }
        },
        {
            "typeId": "8e236b26-4853-4257-91cf-a7dc4255d51f",
            "timeSeriesId": [
                "device1"
            ],
            "name": "TempHumSensorKitchen",
            "description": "Kitchen temperature and humidity sensor",
            "hierarchyIds": [
                "c9213b88-8ee8-4dd0-b3f1-b6f82cf48294"
            ],
            "instanceFields": {
                "Floor": "Ground Floor",
                "Room": "Kitchen"
            }
        }
    ],
    "continuationToken": "aXsic2tpcCI6MTAwMCwidGFrZSI6MTAwMCwicmVxdWVzdEhhc2hDb2RlIjoxOTQ3MjUzNzgyLCJlbnZpcm9ubWVudElkIjoiNWRiNmYzYmEtYjdkZS00OWVkLWFmZjQtYzE2ZmNhZDk4NTY4In0="
}
As you can see in the JSON object above, each instance contains a reference to the typeID, which in fact is our data type we have created earlier in this post manually. To assign the device0 to our Temperature Zone Data Type, I can just do a POST to a different URL and provide a JSON Object as the body! As you can see, in the body, i have just copy & paste the typeID from the Temperature Zone to the instance what I have called TempHumSensorLivingRoom.
In fact, for all of the other model APIs, the procedure is the same!
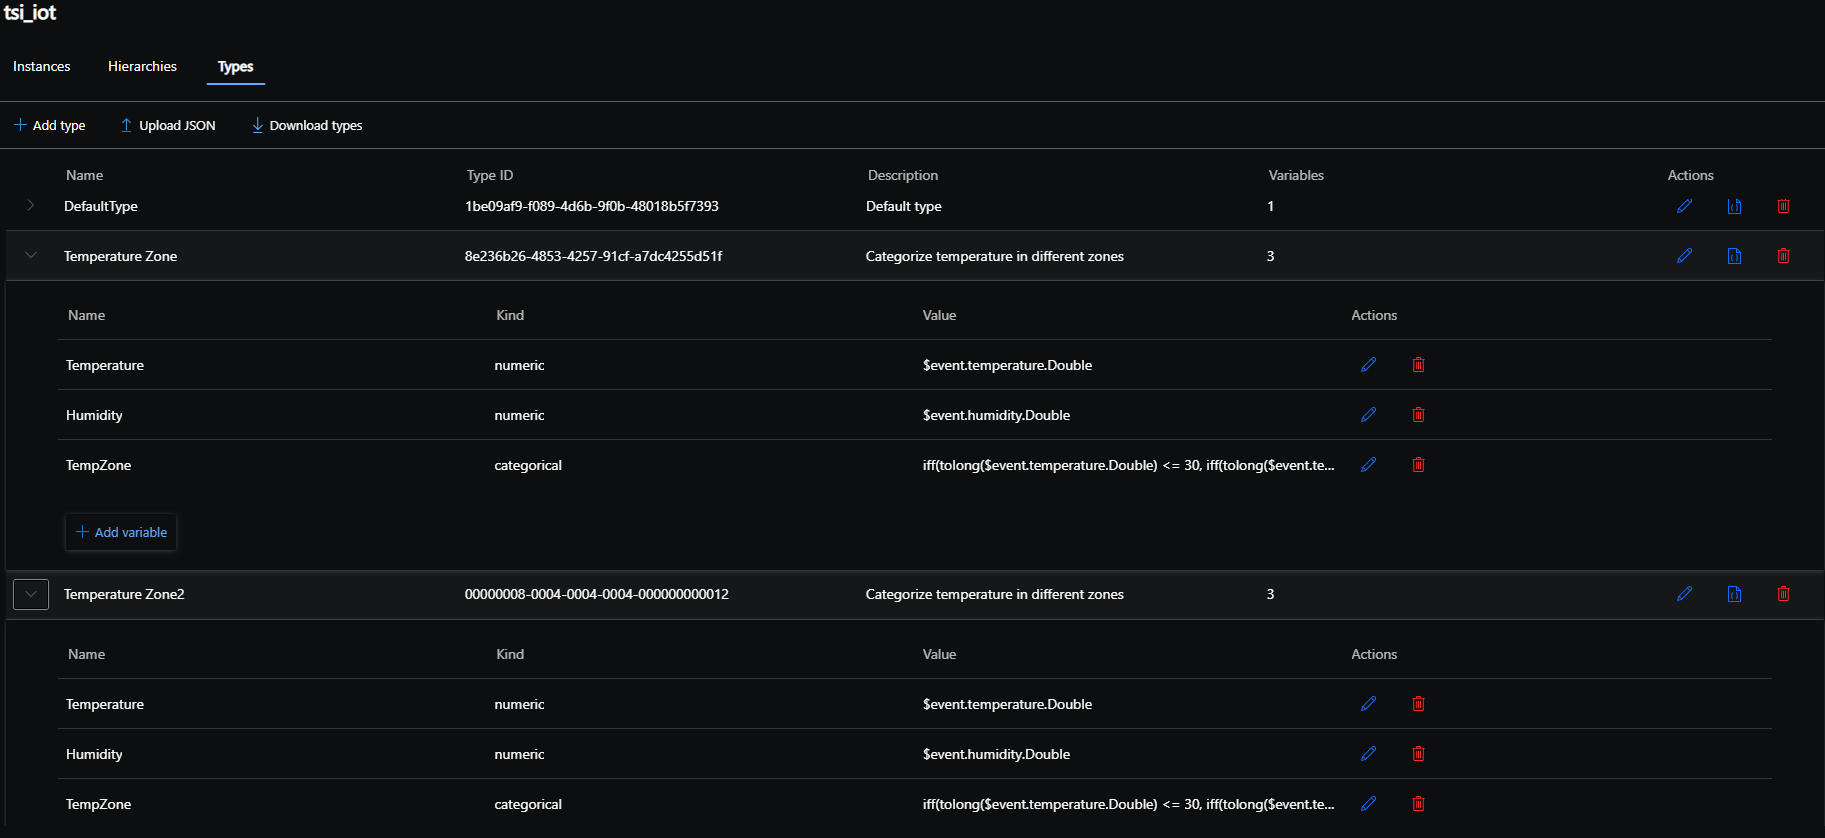
Let´s take a look to create another Data Type with the exakt same variables than before. Makes probably no sense in this case, but i would like to show how easy it is!
In the Azure TSI Explorer, you can get the JSON Object for any existing data type. For this, you can click the JSON icon on the Temperature Zone Type and copy the content.

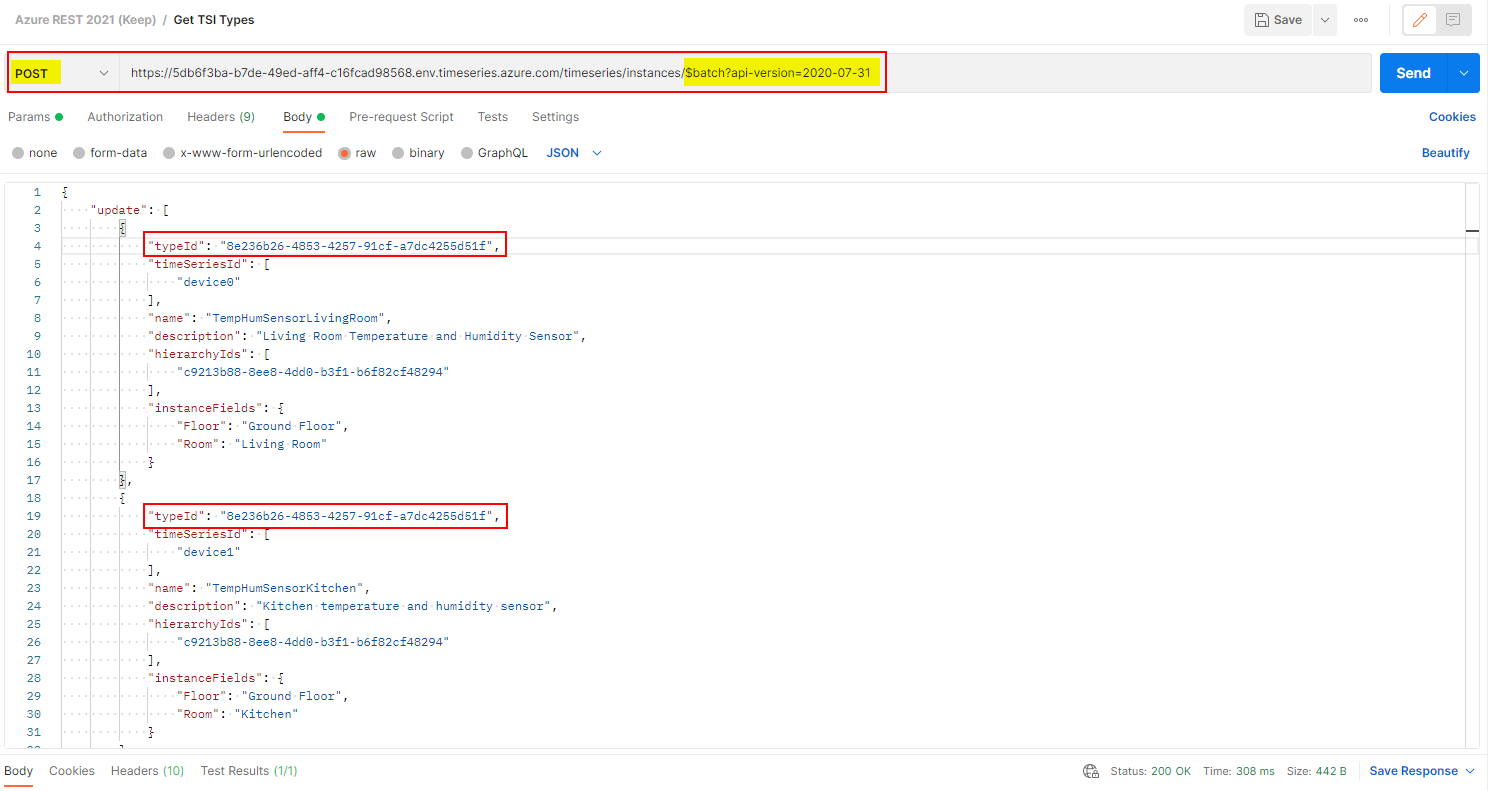
To create a new data type you need a special REST API URL. This time we are using the following:
https://5db6f3ba-b7de-49ed-aff4-c16fcad98568.env.timeseries.azure.com/timeseries/types/$batch?api-version=2020-07-31
and simply coping the JSON object in the request body. You need to change the ID, otherwise you are updaing an existing object and to visualize it better, I have changed the name as well and added a 2 at the end.
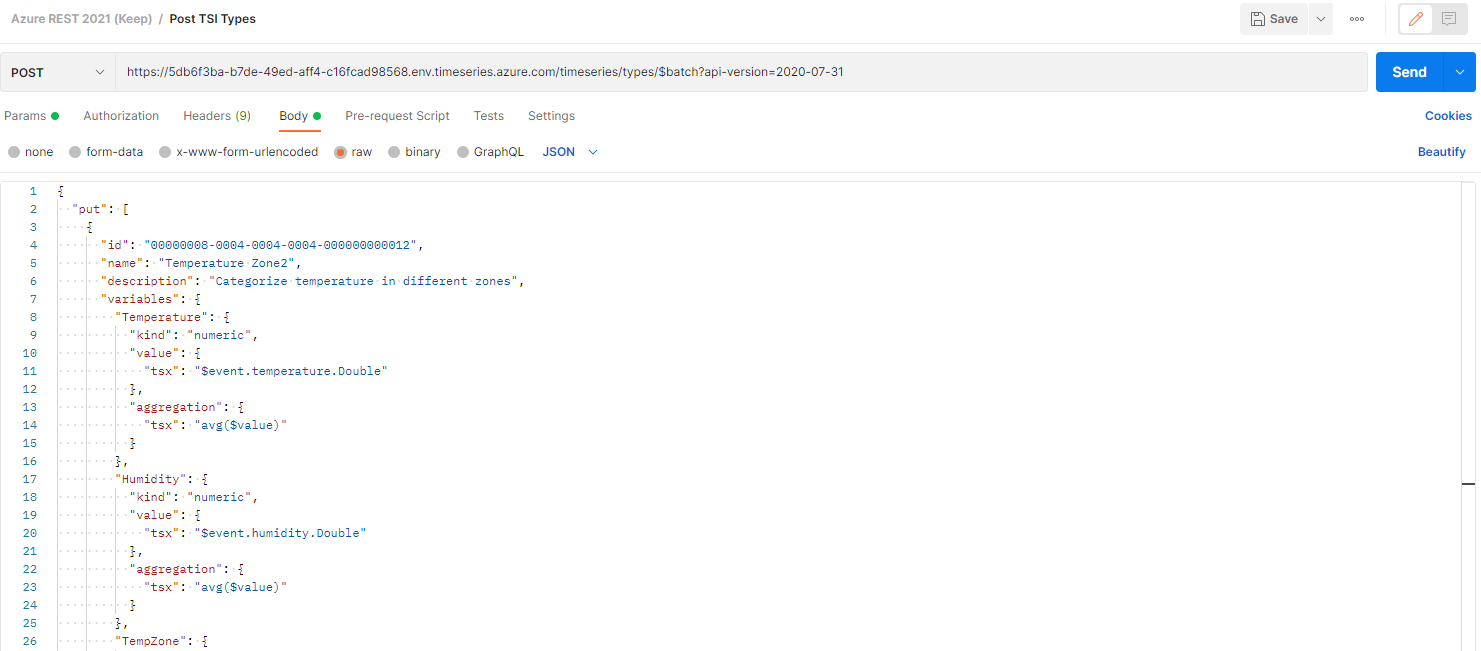
As you see, this was way faster and way less effort to create / dupilcate a data type!
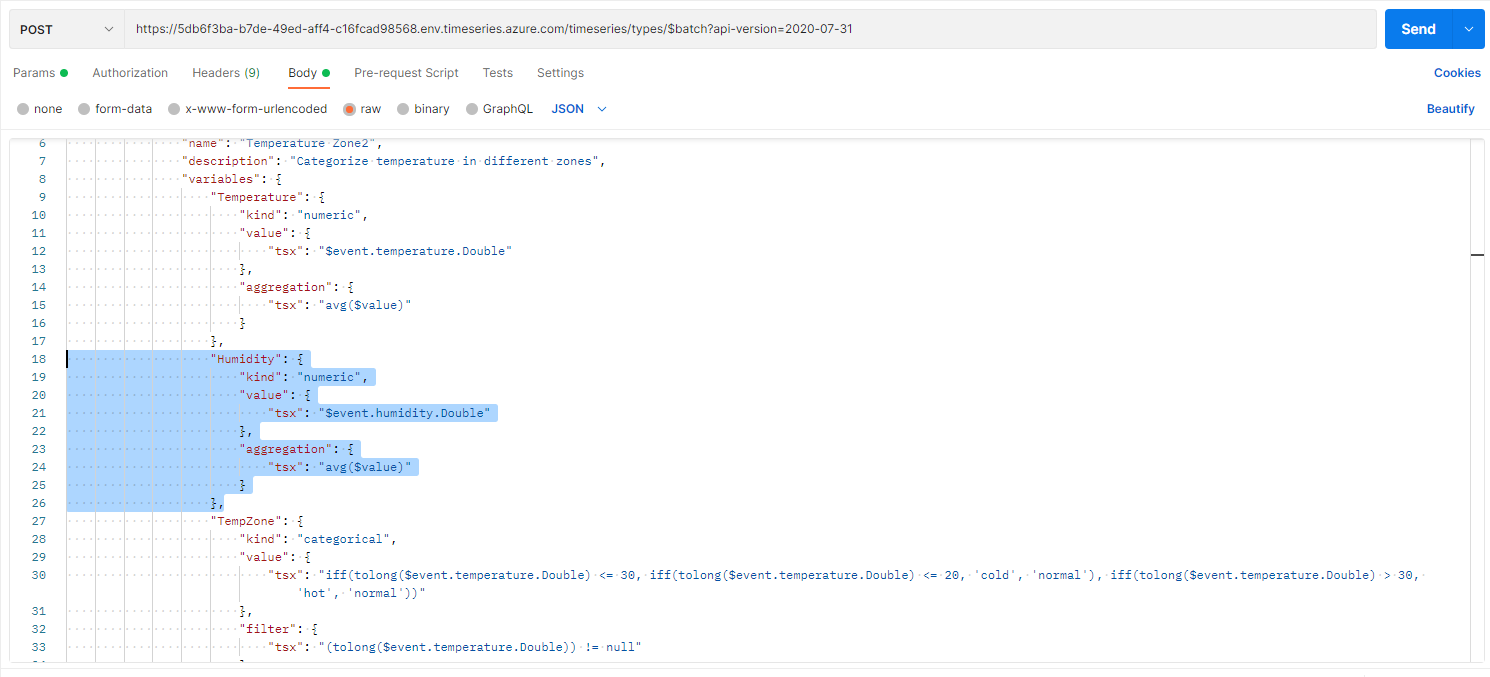
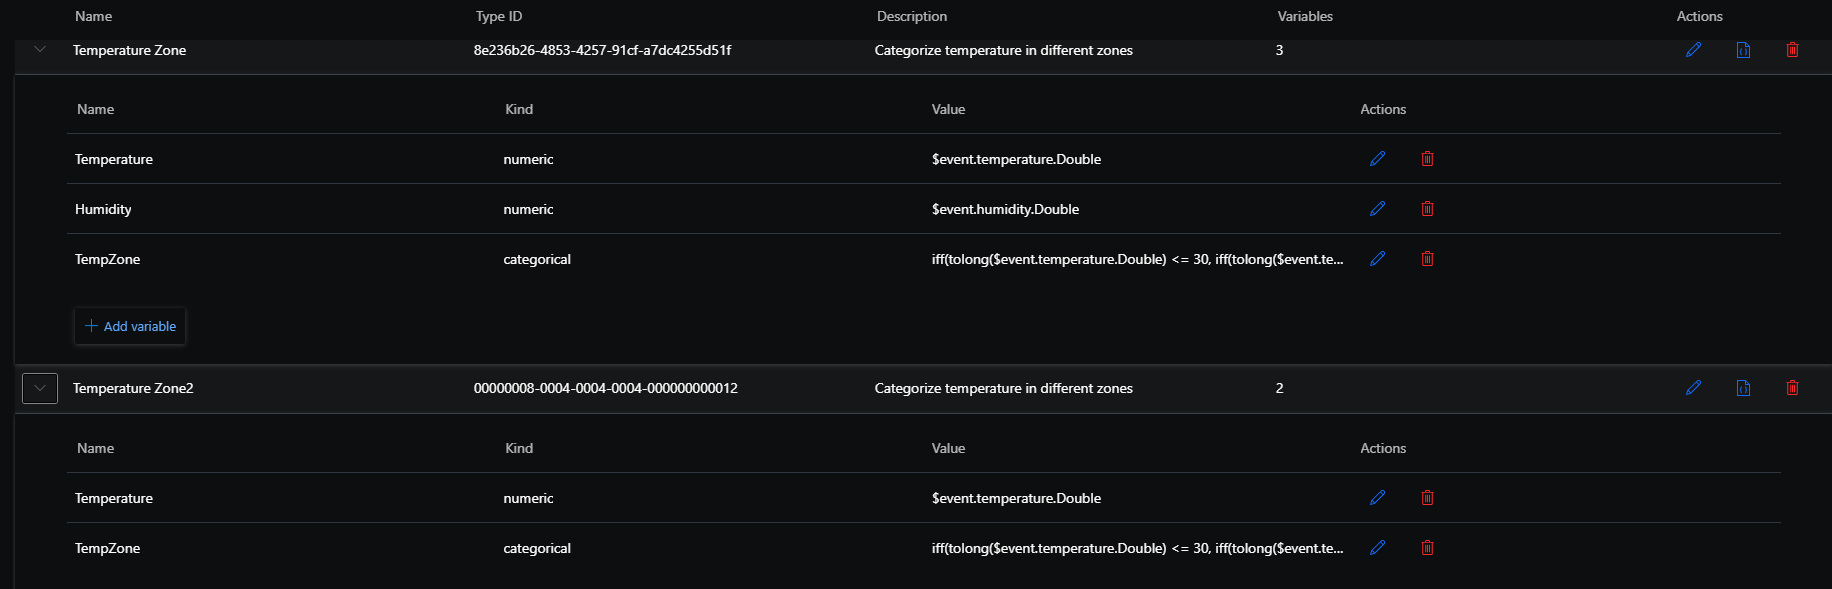
If you would like to remove an variable from an TSI data type, you can again use the put method to just update your selected data type. Just remove the variable from the request body and call the api as supposed to. This should update the data type accordingly!
In my example, i will remove the Humidity variable and send the post command to the api.
understanding interpolation
Interpolation is a method of constructing “missing” data points based on the range of known data points. I know that Azure Time Series Insights could construct such data points. The next quick example should showcase how easy it is to construct those missing data points. Interpolation is configured in the variables of a data type! In my scenario, I use the numeric temperature field to use interpolation. Not every kind of variable can use interpolation. You can check this microsoft page to explore which kind can use interpolation.
As an example let´s take a look at my simulated IoT sensor data again. This graph contains all the data points available from my raw data! As you can see, each hour in this case, my IoT sensor sent some data to event hub. But like the screenshot shows, at 1pm, the sensor didn´t send anything! The dashed-line represents a missing data point. This is not yet interpolation, TSI just present this differently to let you know something is different at this point!
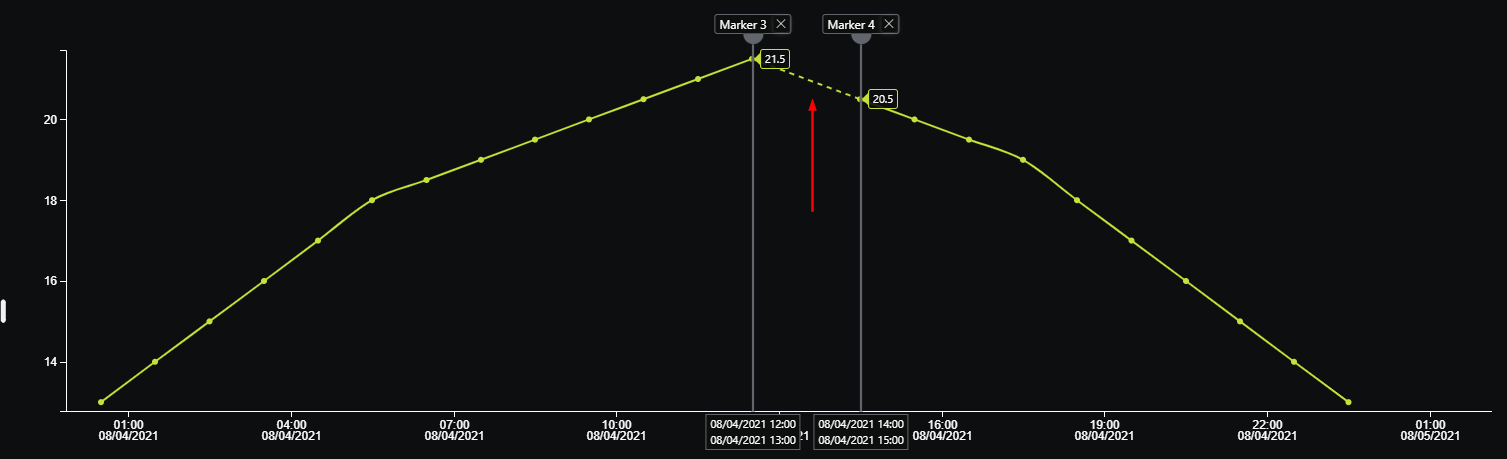
In the raw reading from the sensor you also see this.

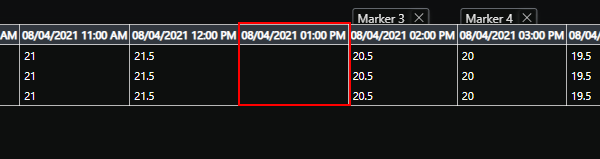
You can also check the chart data as a table to see the missing sensor data for the given time.
turn on interpolation
Now as we have identified the missing data point, let´s turn on interpolation to construct this point. As mentioned above, you can turn on interpolation on the variable of the data type. Take care that it does not work for every aggregation type. I just updated my temperature variable inside the json object
        "Temperature": {
          "kind": "numeric",
          "value": {
            "tsx": "$event.temperature.Double"
          },
          "aggregation": {
            "tsx": "right($value)"
          },
          "interpolation": {
            "kind": "linear",
            "boundary": {
              "span": "PT1H"
            }
          }
        },
The boundary defines the time range from the left or right of the search span to be used for interpolation. Therefore you have to change as well the aggregation type to left or right and define the timespan!
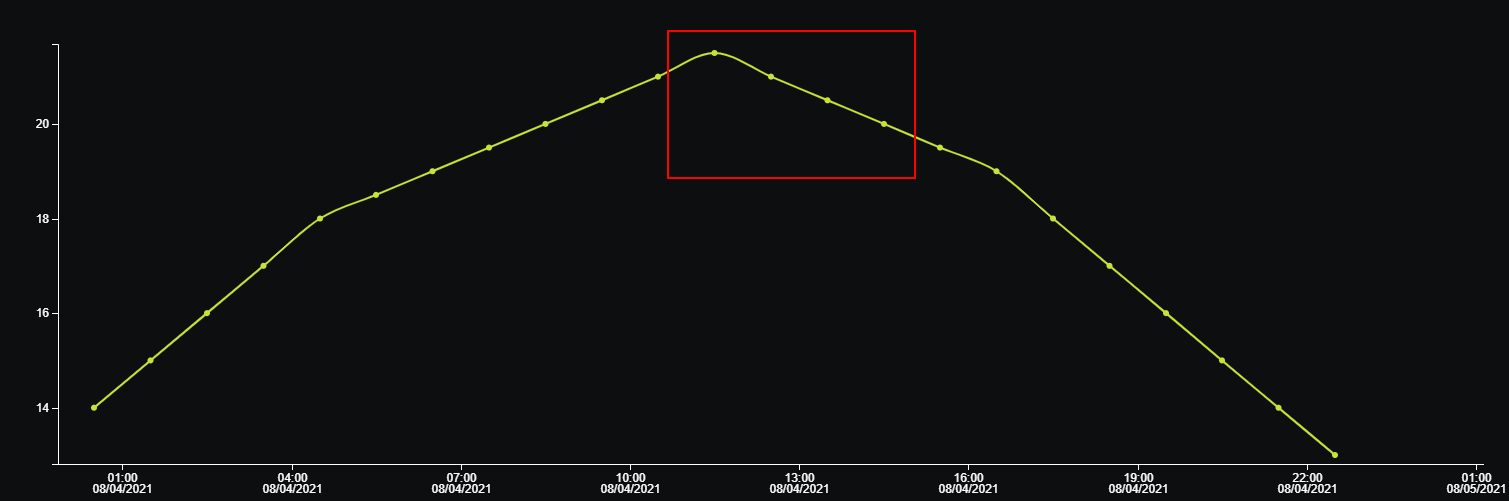
After you set interpolation, you can see that a data point has been created as well as the table view reflect the intervention.

With this blogpost i just wanted to give you an overview about how to connect your TSI environment to a data source and adjust settings for bulk operations!
| Link | Description |
|---|---|
| Azure Time Series event sources | https://docs.microsoft.com/en-us/azure/time-series-insights/concepts-streaming-ingestion-event-sources |
| Azure Time Series instances | https://docs.microsoft.com/en-us/azure/time-series-insights/concepts-model-overview#time-series-model-instances |
| Azure Time Series hierarchies | https://docs.microsoft.com/en-us/azure/time-series-insights/concepts-model-overview#time-series-model-hierarchies |
| Azure Time Series Types | https://docs.microsoft.com/en-us/rest/api/time-series-insights/dataaccessgen2/time-series-types/execute-batch#definitions |